Getting Started
Requirements
PySideExtn was manually tested in different test environment(in different OS, Python versions and PySide2 versions). The following data was obtained by conducting tests using Example codes(same one which is given in the Example Section) in the respective version of PySide2 and Python in Windows and Linux(Ubuntu 20.04).
Recommended
Windows, Linux, MaxOSX.
Python >3.7 and PySide2, PyQt5, PySide6 or PyQt6
Installing PySideExtn/PyQtExtn
- Install PySideExtn using
pip
pip install PySideExtn
- Install from
.whlfile.
pip install <PySideExtn------.whl>file
Quick Demo Application
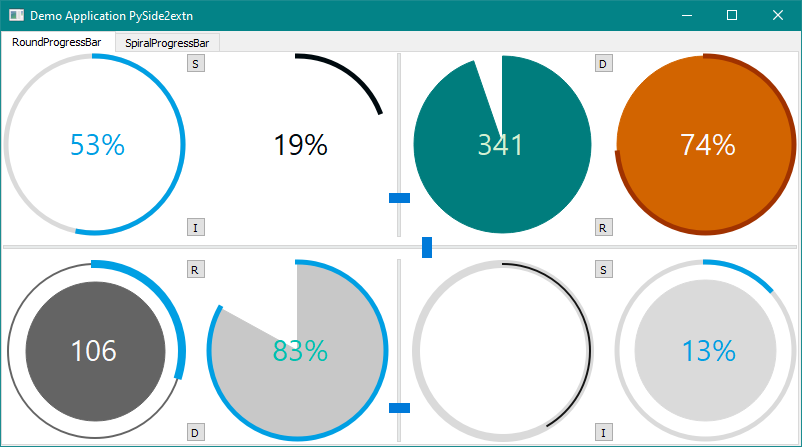
Quick demo help you to check weather you have successfully installed the Python Package and you are good to go. It comes with a UI loaded with all the widgets in this package with its different customized views. Users can easily differentiate the different styling elements used by widgets.
After installing the PySideExtn/PyQtExtn the users can try out quick demo by:
- Open the
cmdorterminal. OpenPython
>> from PySideExtn.demo import demo
>> demo.main()   #PRESS ENTER AND YOU WILL GET A DEMO APPLICATION
Using with QtDesigner
Many a time designing a GUI is better done using the inbuild QtDesigner as it greatly reduces the designing time. The PySideExtn widgets doesn’t natively have the drag and drop widget feature but you can turn a QFrame to a RoundProgressBar widget or to any other PySideExtn widgets. The steps to do is detailed below:
- Place a QFrame in the exact place where you want the PySideExtn widget to be.
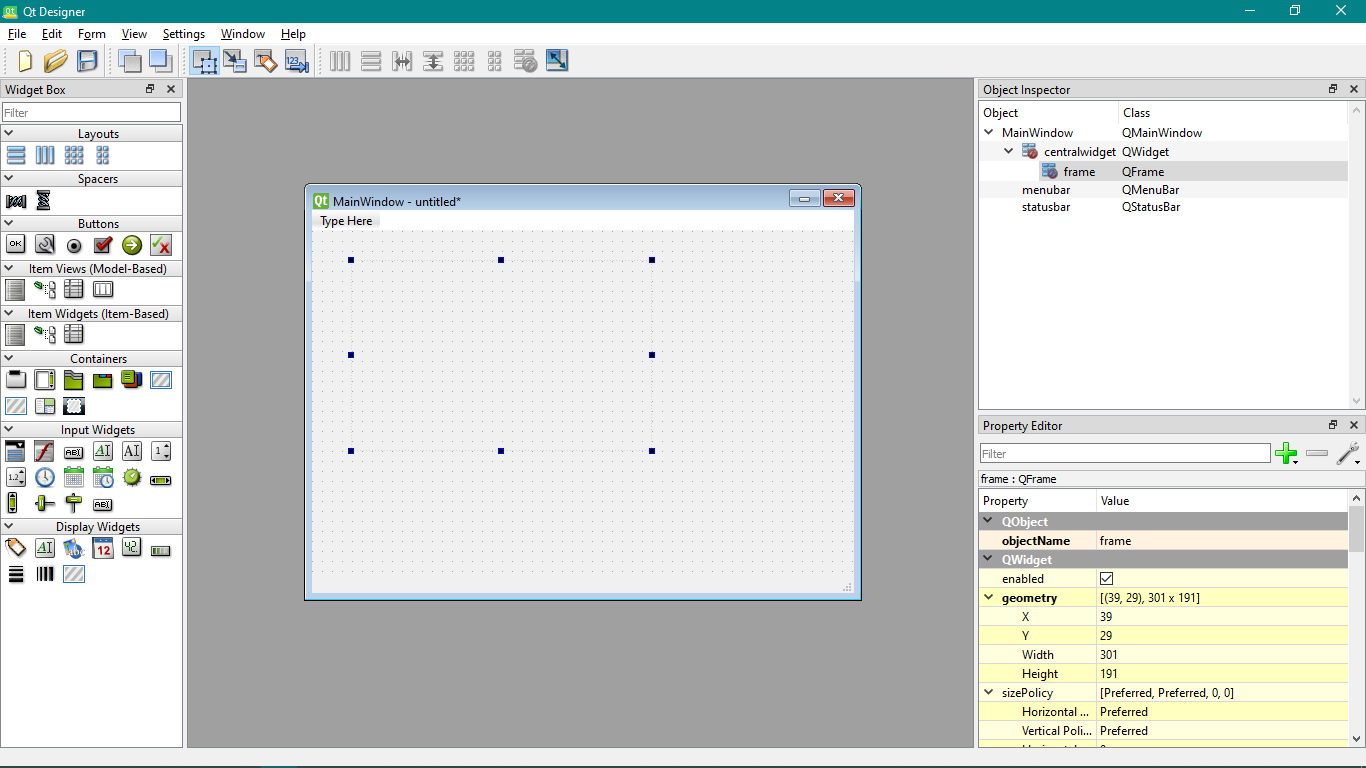
- Go to the
Object Inspectorand right click on the QFrame you just created, then click on thePromote tomenu, you will see a Promote Widget window popup.
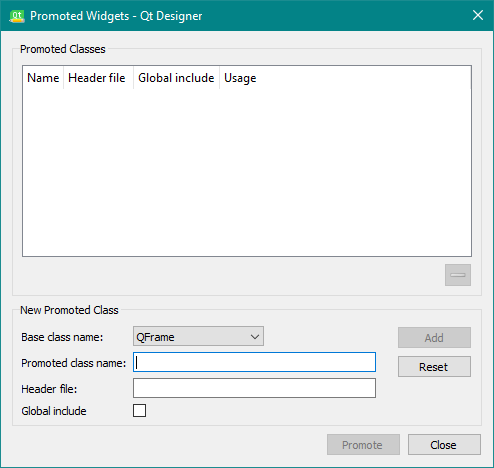
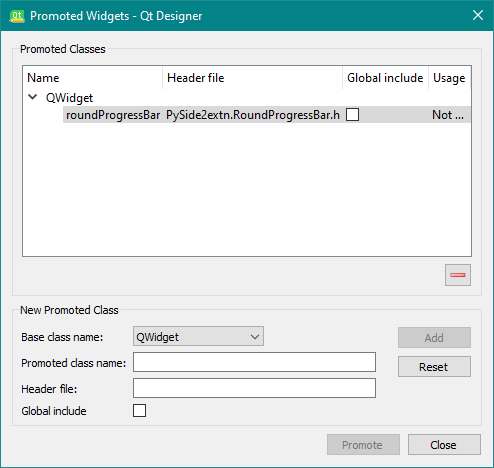
- Create a new Class: for which enter the details(see image) in the
Base Class Name,Promoted class nameandHeader fileslots and pressAdd. Here we used the RoundProgressBar Class, but you can use any other class in the PySideExtn package.- Base Class Name: Always
QWidget - Promoted Class Name : The class name of the widget you want to use:
RoundProgressBarorSpiralProgressBar. - Header File: It is always the
PySideExtn.RoundProgressBar.horPySideExtn.SpiralProgressBar.h
- Base Class Name: Always
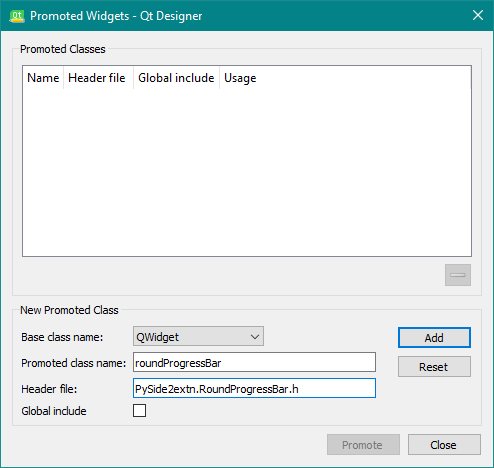
- After adding you can see a new Promoted Classes gets one new widget. Then close the Popup.
- After this again right click on the QFrame that we have created and click on
Morph intoand select theQWidgetoption. Now the QFrame has changes to QWidget. Now once more right click on to the newly formed QWidget and select:Promote Toand select theRoundProgressBaroption from there.

-
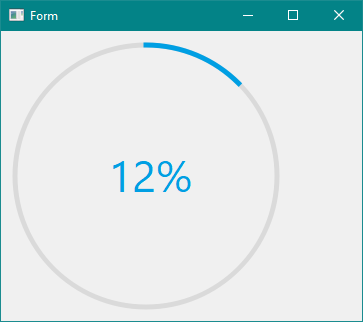
That’s it, you have placed a PySideExtn Widget into your Application. At present in the QtDesigner you will not see any image of the roundprogressbar but you can use the RoundProgressBar inside the python code you write. Convert the
.uifile to python file using thepyside2-uicand create a new file and write the following code to display the new made window.import sys from PySide6 import QtCore, QtGui, QtWidgets from PySide6.QtCore import (QCoreApplication, QPropertyAnimation, QDate, QDateTime, QMetaObject, QObject, QPoint, QRect, QSize, QTime, QUrl, Qt, QEvent) from PySide6.QtGui import (QBrush, QColor, QConicalGradient, QCursor, QFont, QFontDatabase, QIcon, QKeySequence, QLinearGradient, QPalette, QPainter, QPixmap, QRadialGradient, QPen) from PySide6.QtWidgets import * #IMPORT PYSIDEEXTN WIDGET YOU USED IN THE QTDESIGNER FOR DESIGNING. from PySideExtn.RoundProgressBar import RoundProgressBar #UI FILE CONVERTED FROM .ui to python file ui.py from ui import Ui_Form class MainWindow(QWidget): def __init__(self): super(MainWindow, self).__init__() self.ui = Ui_Form() self.ui.setupUi(self) if __name__=="__main__": app = QApplication(sys.argv) window = MainWindow() window.show() sys.exit(app.exec_())Run this file and we can see the RoundProgressBar in the QFrame we made.
Exploring Further
Dive deeper into the package check the links below.
See: Examples