QT-PyQt-PySide-Custom-Widgets - QPushButtonGroup(QT Grouped Buttons)
Install the custom widgets
pip install QT-PyQt-PySide-Custom-Widgets
QT Grouped Navigation Buttons
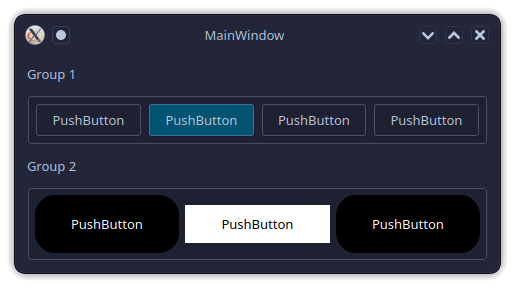
With QT-PyQt-PySide-Custom-Widgets, you can group navigation bittons together. The aim of this functionality is to apply a new style the clicked QPushButton in a group(Active button), an apply a different style to the rest of the QPushButtons in a group(Inactive button)
Grouping the buttons
After designing your GUI, inside the root of your project folder, create the “style.json” file which will contain all the values that will customize your GUI.
Inside the “style.json” file create “QPushButtonGroup” main object:
{
	"QPushButtonGroup": [{
	}]
}
Pass the name of the buttons belonging to the same group:
{
	"QPushButtonGroup": [{
		"Buttons": [
			"pushButton",
			"pushButton_2",
			"pushButton_3",
			"pushButton_4"
		]
	}]
}
Set the default active button:
"ActiveButton": "pushButton",
Pass the style that will be applied to the active and the inactive buttons:
{
	"QPushButtonGroup": [{
		"Buttons": [
			"pushButton",
			"pushButton_2",
			"pushButton_3",
			"pushButton_4"
		],
		"ActiveButton": "pushButton",
		"Style":[{
			"Active": "background-color: #015371;",
			"NotActive": "background-color: transparent;"
		}]
	}]
}
You can have as many button groups as you want:
{
	"QPushButtonGroup": [
		{
			"Buttons": [
				"pushButton",
				"pushButton_2",
				"pushButton_3",
				"pushButton_4"
			],
			"Style":[{
				"Active": "background-color: #015371;",
				"NotActive": "background-color: transparent;"
			}]
		},
		{
			"Buttons": [
				"pushButton_5",
				"pushButton_6",
				"pushButton_7",
				"pushButton_8"
			],
			"Style":[{
				"Active": "background-color: #fff; border-radius: 0px;",
				"NotActive": "background-color: #000; border-radius: 20px;"
			}]
		},
	]
}
Set dynamic style using app theme variables:
"QPushButtonGroup": [
        {
            "Buttons": [
                "homeBtn",
                "meetingsBtn",
                "downloadsBtn"
            ],
            "ActiveButton": "homeBtn",
            "Style":[
                {
                    "Active": "QPushButton{background-color: $COLOR_BACKGROUND_4;}",
                    "NotActive": "QPushButton{background-color: transparent;}"
                }
            ]
        }
	],
More
Watch the full video tutorial here https://youtu.be/fPgwQJUFPIw