QT-PyQt-PySide-Custom-Widgets - Customizing QStacked Widgets
Install the custom widgets
pip install QT-PyQt-PySide-Custom-Widgets
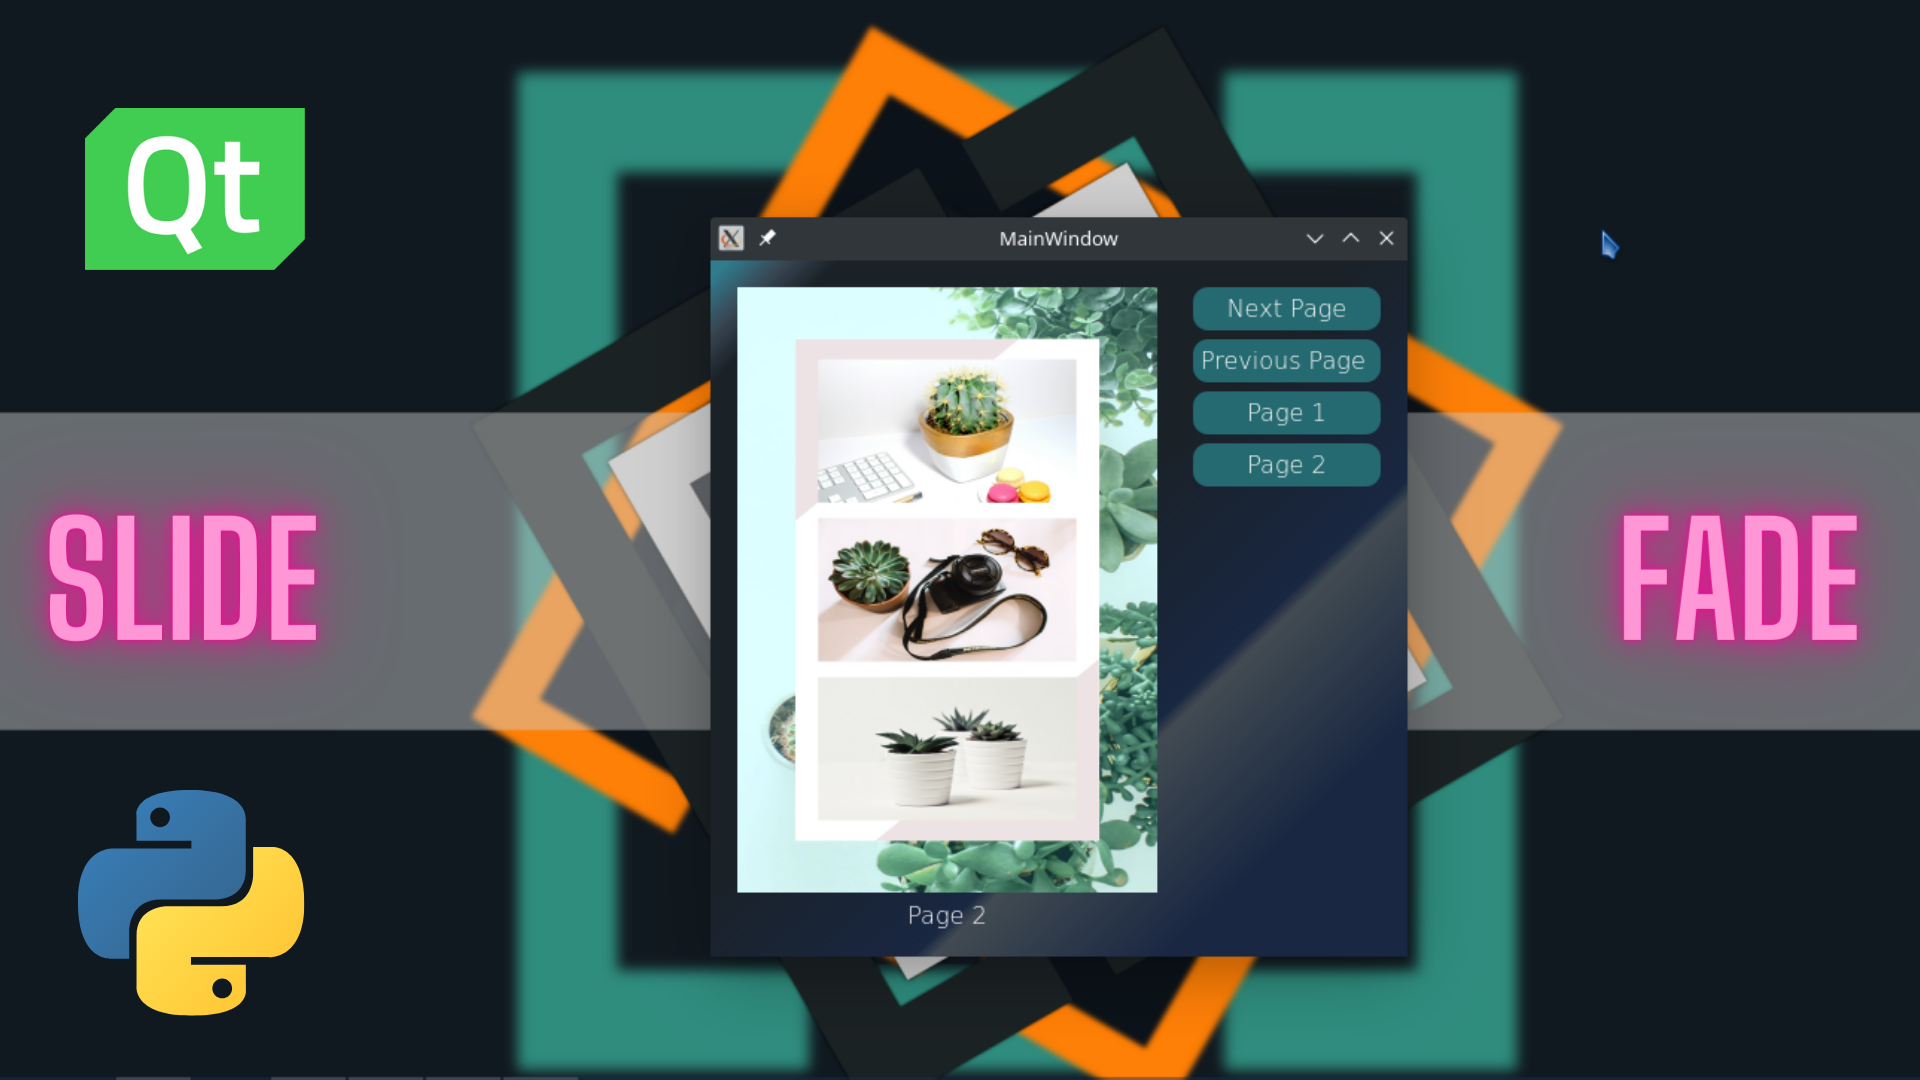
Customizing QStacked Widgets
The following steps will show you how to customize the look and animation of your QStackedWidget.
1. Create QStacked Widgets.
You can create a QStacked Widgets directly from your python file or use the QT Designer app. In this demo, we will be using QT Designer app.
Create user interface containing QStacked Widgets.
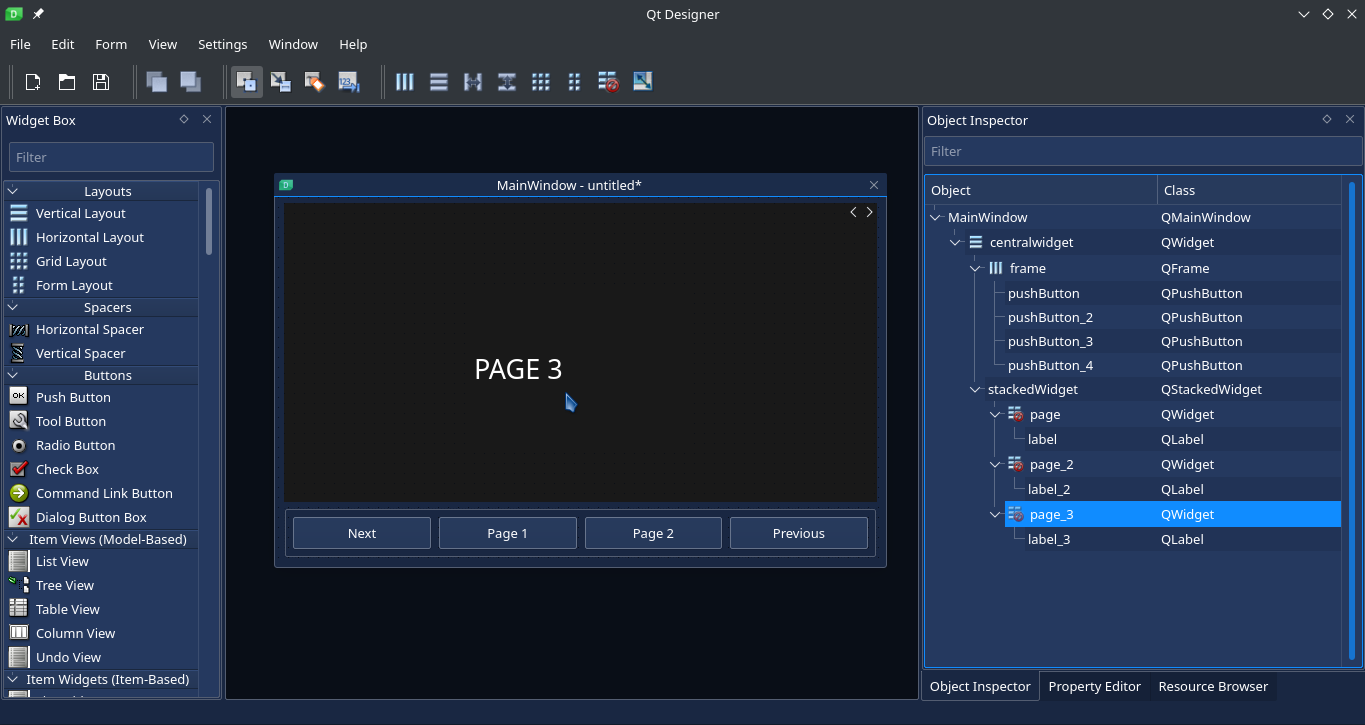
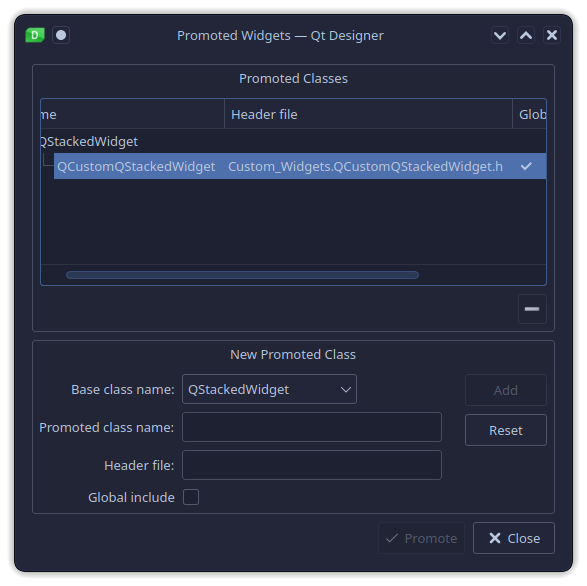
- Add the promote class to the QStacked Widget
Right click on the QStacked then select
promote to..then enter theclassandheader filename as shown below:

- “Base class name:
QStackedWidget- “Promoted class name”:
QCustomQStackedWidget- “Header file”:
Custom_Widgets.QCustomQStackedWidget.h
-
Click
add, then clickpromote -
Import your UI python code.
-
Now create a file inside your project folder and name it “main.py”.
2. Add Navigations And Animations To QStacked Widgets.
Using QT-PyQt-PySide-Custom-Widgets library, you can easily add navigation functions and animate your Qstackedwidgets. This can be achieved directly from your python file or using a JSon file.
Customize QStacked Widgets from your python file.
The first step is to import QT-PyQt-PySide-Custom-Widgets library to the python file where you created the QStacked Widgets.
########################################################################
# IMPORT CUSTOM BUTTONS FILE
from Custom_Widgets import *
########################################################################
Adding navigation
QT-PyQt-PySide-Custom-Widgets provides an easy way to navigate through your QStacked widgets.
To navigate to the next widget page:
# myStackedWidget is the name of your stacked widget
# slideToNextWidget() shows the next widget page
myStackedWidget.slideToNextWidget()
To navigate to the previous widget page:
# myStackedWidget is the name of your stacked widget
# slideToPreviousWidget() shows the previous widget page
myStackedWidget.slideToPreviousWidget()
You can also add click events to your buttons. Assuming you have two buttons named “nxt” and “prev”:
# myStackedWidget is the name of your stacked widget
# slideToNextWidget() shows the next widget page
# slideToPreviousWidget() shows the previous widget page
# nxt and prev are navigation buttons
prev.clicked.connect(lambda: myStackedWidget.slideToPreviousWidget())
nxt.clicked.connect(lambda: myStackedWidget.slideToNextWidget())
To navigate to a particular page:
# Navigate to page1
myStackedWidget.setCurrentWidget(page1)
Navigate to a particular page on button click:
# Navigate to page1 on page1_btn button click
page1_btn.clicked.connect(lambda: myStackedWidget.setCurrentWidget(page1))
Animating QStacked Widgets
You can add “fade” and “slide” animations to your QStacked widget. You can also fully customize these animations.
Fade Animation
Add fade animation to your QStacked widget when transitioning between pages.
########################################################################
## QSTACKWIDGETS FADE ANIMATION
# ########################################################################
# Set setFadeTransition to True if you want the pages to fade
# otherwise set it to False
# The default value is False
myStackedWidget.setFadeTransition(True)
# Set the fade animation duration
myStackedWidget.setFadeSpeed(500)
# Set the fade easing curve
myStackedWidget.setFadeCurve(QtCore.QEasingCurve.Linear)
Slide Animation
Add slide animation to your QStacked widget when transitioning between pages. Pages can slide horizontally or vertically
########################################################################
## QSTACKWIDGETS SLIDE ANIMATION
# ########################################################################
# Set setSlideTransition to True if you want the pages to slide
# otherwise set it to False
# The default value is False
myStackedWidget.setSlideTransition(True)
# Set the slide animation duration
myStackedWidget.setTransitionSpeed(500)
# Set the slide easing curve
myStackedWidget.setTransitionEasingCurve(QtCore.QEasingCurve.Linear)
To slide horizontally:
# Set horizontal page transition between pages
myStackedWidget.setTransitionDirection(QtCore.Qt.Horizontal)
To slide vertically:
# Set vertical page transition between pages
myStackedWidget.setTransitionDirection(QtCore.Qt.Vertical)
Customize QStacked Widgets from your JSon file.
The recommended way to customize your QStacked widgets using QT-PyQt-PySide-Custom-Widgets library is through a JSon file.
Inside your project folder, create a file and name it “style.json”. Inside this file, create a “QCustomQStackedWidget” object which will contain all QStackedWidget names and their custom values.
{
	"QCustomQStackedWidget":[
		{
			"name":"myStackedWidget"
		},
		{
			"name":"myStackedWidget_2"
		},
		{
			"name":"myStackedWidget_3"
		}
	]
}
Adding navigations to QStacked from a JSon file.
Add next(“nxt”) and previous(“prev”) button names, which when clicked the QStacked will show the next or previous page from current active page index.
{
	"QCustomQStackedWidget":[
		{
			"name":"myStackedWidget",
			"navigation":[
				{
					"nextPage":"nxt",
					"previousPage": "prev"
				}
			]
		}
	]
}
You can also add other buttons which will navigate to a particular page as shown: In this example when “page1” button is clicked, “page” page will be shown, when “page2” button is clicked, “page_2” page will be displayed in QStacked widget
{
	"QCustomQStackedWidget":[
		{
			"name":"myStackedWidget",
			"navigation":[
				{
					"navigationButtons":[
						{
							"page1": "page",
							"page2": "page_2"
						}
					]
				}
			]
		}
	]
}
Full navigation exaple will look like this:
{
	"QCustomQStackedWidget":[
		{
			"name":"myStackedWidget",
			"navigation":[
				{
					"nextPage":"nxt",
					"previousPage": "prev",
					"navigationButtons":[
						{
							"page1": "page",
							"page2": "page_2"
						}
					]
				}
			]
		}
	]
}
Adding transtion animations to QStacked from a JSon file.
Add fade animation:
{
	"QCustomQStackedWidget":[
		{
			"name":"myStackedWidget",
			"transitionAnimation":[
				{
					"fade":[
						{
							"active": true
						}
					]
				}
			]
		}
	]
}
Set fade animation duration:
{
	"QCustomQStackedWidget":[
		{
			"name":"myStackedWidget",
			"transitionAnimation":[
				{
					"fade":[
						{
							"duration": 1000
						}
					]
				}
			]
		}
	]
}
Set fade animation easing curve:
{
	"QCustomQStackedWidget":[
		{
			"name":"myStackedWidget",
			"transitionAnimation":[
				{
					"fade":[
						{
							"easingCurve": "Linear"
						}
					]
				}
			]
		}
	]
}
Full fade animaion customization code will look like this:
{
	"QCustomQStackedWidget":[
		{
			"name":"myStackedWidget",
			"transitionAnimation":[
				{
					"fade":[
						{
							"active": true,
							"duration":1000,
							"easingCurve": "Linear"
						}
					]
				}
			]
		}
	]
}
Add Slide animation:
{
	"QCustomQStackedWidget":[
		{
			"name":"myStackedWidget",
			"transitionAnimation":[
				{
					"slide":[
						{
							"active": true
						}
					]
				}
			]
		}
	]
}
Set Slide animation duration:
{
	"QCustomQStackedWidget":[
		{
			"name":"myStackedWidget",
			"transitionAnimation":[
				{
					"slide":[
						{
							"duration": 500
						}
					]
				}
			]
		}
	]
}
Set Slide animation easing curve:
{
	"QCustomQStackedWidget":[
		{
			"name":"myStackedWidget",
			"transitionAnimation":[
				{
					"slide":[
						{
							"easingCurve": "OutBack"
						}
					]
				}
			]
		}
	]
}
Set Slide animation easing direction:
Horizontal direction:
{
	"QCustomQStackedWidget":[
		{
			"name":"myStackedWidget",
			"transitionAnimation":[
				{
					"slide":[
						{
							"direction": "horizontal"
						}
					]
				}
			]
		}
	]
}
OR vertical direction:
{
	"QCustomQStackedWidget":[
		{
			"name":"myStackedWidget",
			"transitionAnimation":[
				{
					"slide":[
						{
							"direction": "vertical"
						}
					]
				}
			]
		}
	]
}
Full slide animaion customization code will look like this:
{
	"QCustomQStackedWidget":[
		{
			"name":"myStackedWidget",
			"transitionAnimation":[
				{
					"slide":[
						{
							"active":true,
							"duration": 500,
							"direction": "horizontal",
							"easingCurve": "OutBack"
						}
					]
				}
			]
		}
	]
}
The full QStacked JSon customization code:
{
	"QCustomQStackedWidget":[
		{
			"name":"myStackedWidget",
			"transitionAnimation":[
				{
					"fade":[
						{
							"active": true,
							"duration":1000,
							"easingCurve": "OutBack"
						}
					],
					"slide":[
						{
							"active":true,
							"duration": 1000,
							"direction": "horizontal",
							"easingCurve": "OutBack"
						}
					]
				}
			],
			"navigation":[
				{
					"nextPage":"nxt",
					"previousPage": "prev",
					"navigationButtons":[
						{
							"page1": "page",
							"page2": "page_2"
						}
					]
				}
			]

		}
	]
}
Applying style from JSon file to QStacked widgets
To apply your JSon style from “style.json” to the user inteface, just call loadJsonStyle(ui):
########################################################################
## LOAD QSTACKWIDGETS ANIMATION AND NAVIGATIONS FROM JSON FILE
########################################################################
# ui  is the window class that contains the user interface widgets
loadJsonStyle(self, ui)